
I Hacked an IKEA Play Table Into a Magical Light Box for Under $100 — Here’s How
Back when I was a one-kid mom, every milestone felt like breaking news. I logged first steps, Googled growth charts, and triple-checked every “Is this normal?” list. My son aced almost everything—until his preschool started talking letters and numbers.
He could quote whole picture books and spot details I’d missed (“Mom, that squirrel shows up on every page!”), but the moment the printed squiggles were supposed to mean something, he shut down. He could count and write 1 through 5 with ease, then hit a wall. 6 through 10 might as well have been hieroglyphics.
With a virtual kindergarten assessment looming—and pandemic life turning me into his accidental homeschool teacher—I needed a strategy. My kid loved anything messy, so we tried polymer clay, a pasta machine, and alphabet cutters. It bought me a few victories, but we needed something bigger.
So I built a light table.
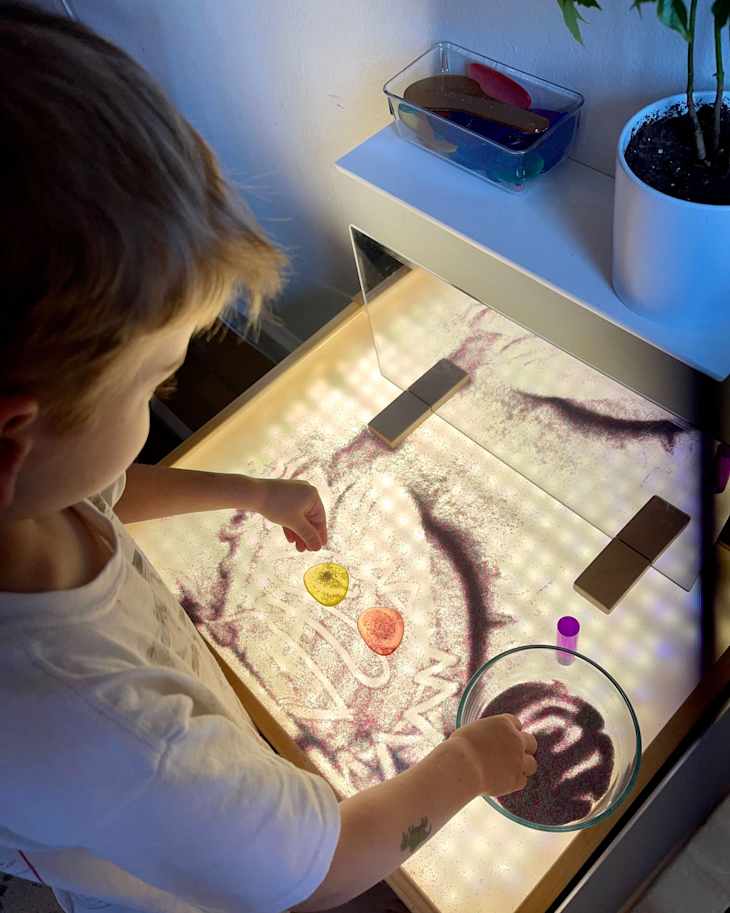
Think overhead-projector magic, shrunk to kid size: an IKEA LÄTT table, an LED strip, and a sheet of acrylic. Sprinkle sand on top and you’ve got a fingertip-tracing pad; add water beads or oobleck and it morphs into a mini science lab. Lights off? It’s back to being the everyday craft table.
How to Hack an IKEA LÄTT Table Into a Light Box
Cost to transform: about $95
Build time: one afternoon
The best part? My letter-resistant son was tracing numbers in sand within minutes at age three—now eight, he still crowds around the table whenever it glows. My twins started using it at 18 months and haven’t stopped exploring since.
What began as a simple piece of furniture has grown into a sensory-rich play hub and stealth learning lab.
Ready to make your own? Here’s how:
What You’ll Need
- Acrylic/plexiglass sheet, $37
- Tape-back LED light strips, $20
- Frosted glass spray paint , $7
- Handheld saw, $22
- Corner brace, $9
Optional
Instructions
Step 1: Prepare the acrylic sheet.
Place the original white table top over your acrylic sheet (which should be the exact same size) and trace the corner cutouts.
Cut these corners using a handheld plastic cutter — I found that steady back-and-forth motions at an angle at first work best. The sheet should now fit perfectly where the original tabletop goes.
Next, sand the surface with a sanding sponge. This will help the spray paint adhere evenly.
Then, spray the entire surface with frosted glass paint and let it dry completely. Then apply a second coat (more as needed, allowing the surface to dry between each coat).
Step 2: Attach the LED lights.
Take the original white tabletop and apply your tape-back LED light strips. Starting at one edge, work your way up one side, then loop at the top and come back down, keeping each row about 3/4 inch apart — roughly one finger-width. Let the adhesive set completely before moving the piece. (I learned this the hard way when I flipped it too early to attach to the table and the entire light string came loose!)
Step 3: Assemble everything.
Build the IKEA table according to the instructions, but use your painted acrylic sheet in place of the original top.
Take the original white top, now LED-equipped, and secure it to the underside of the table with the LED lights and white surface facing up toward the acrylic.
Use corner braces to secure it firmly in place.

Step 4: Light it up!
Plug in your LEDs and watch the magic happen. I keep the light as low as possible to protect little eyes, though I need to turn it up when we’re playing during bright daylight hours.
Five years on, that $90 IKEA hack has outlasted every flashy, battery-powered toy in the house. It’s grown with us—from tracing first letters to diagramming fractions, from sensory bins to stop-motion backdrops.
Next up? A sheet of mirror acrylic turns it into a photography lightbox, and a brand-new set of animal X-rays will let the kids play radiologist under the glow. Because once a piece of furniture proves it can reinvent itself, you can’t help but wonder, What else can it do?
More IKEA Hacks