This Has to Be One of the Coolest DIY Additions to Any Kids’ Room

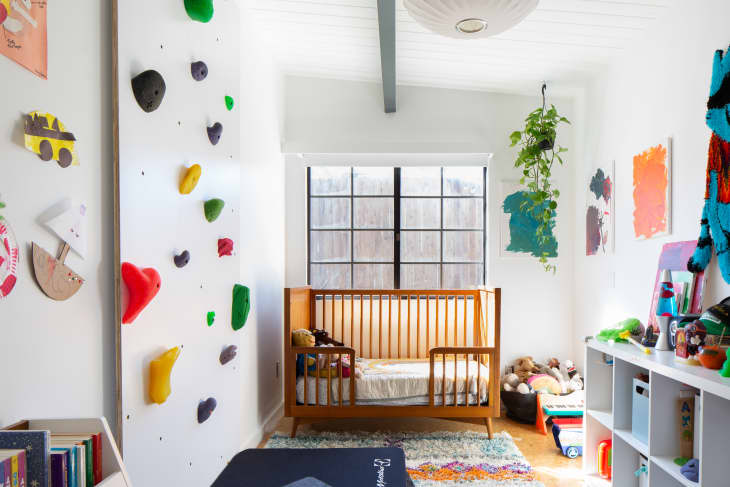
Picture it: It’s a rainy Saturday afternoon, and you’re trapped inside. Unfortunately your kiddos have already streamed the long list of female-led movies, and the toys that usually occupy their attention the longest just aren’t doing it today. If “I’m bored” echoes from the other room, you might be enticed by this family’s all-weather play area in their kid, Waylon’s, space in their mid-century modern California home.
“Waylon has loved to climb ever since before he was even able to walk. When he was 3, I tried taking him to our local climbing gym, but because of his age he wasn’t allowed to participate,” Waylon’s parent, Dylan Odbert, shares.
So, Odbert had a lightbulb moment when he realized that Waylon had big walls in his bedroom — he would build his son his own rock climbing wall. “We always wanted his room to be a fun place for him, but he’s so active that LEGOs and books were only getting us so far,” Odbert says.
Odbert set out to build a safe rock climbing wall for Waylon — here’s how he did it.
How to Build an Indoor Climbing Wall for a Kid’s Room
Before building an indoor climbing wall for his kid, Odbert had to ensure it would be a safe addition. For Waylon’s room, Odbert purchased a crash pad to put at the base of the climbing wall in case his kiddo fell. He also set some ground rules from the beginning.
“Make sure the kids understand how to climb safely,” Odbert recommends for parents who want to build DIY rock climbing walls. “Waylon isn’t allowed to climb if there are toys or other things on the floor that can hurt him if he falls, so it’s a sneaky way to get the room cleaned up!”
Setting the safety tone for the rock climbing wall is the first step. Next, it was time to get building. Here’s a step-by-step guide to how Odbert DIY-built the activity area.
- Purchase a sheet of 14-ply, melamine-coated 3/4” plywood.
- Buy 3/8″ prong T-nuts and drill around 30 holes for the holds, four holes on each corner, and two holes in the center of the plywood to mount it to the wall. (Pro-tip: Odbert used a Forstner drill bit to stop the wood from splintering.)
- Once the holes are drilled, hammer T-nuts into the reverse side of the plywood for the handles.
- Sand the plywood edges with 250-grit sandpaper and seal the edges using a water-based sealer.
- Mount the plywood to the wall using 1-inch steel spacers, a washer, and a wood lag screw.
- Purchase holds. You can either buy new ones or follow Odbert’s lead and go to your local rock climbing gym and ask about buying used holds.
Overall, the entire project cost Odbert around $260, and only took him an afternoon to complete after purchasing the materials. And Waylon’s reaction was worth it all.
“It was a surprise, so Waylon was sooo excited about the climbing wall once it was finished,” Odbert writes. “Not being allowed to climb at my gym was sad for him, but now having one in his own room was truly mind-blowing.”
Waylon’s rock climbing wall is a bit of a hot commodity among the neighborhood kids, and he and his friends love to climb to the top and put action figures on the holds. But the addition has had many more benefits than a fun activity for him and his friends.
“I think the climbing wall has really built Waylon’s confidence, and it gives him and his friends something interesting and active to do even when they’re indoors,” Odbert shares.