
Retro Peel-and-Stick Wallpaper Brought This Vintage Jack-and-Jill Bathroom Back to Life
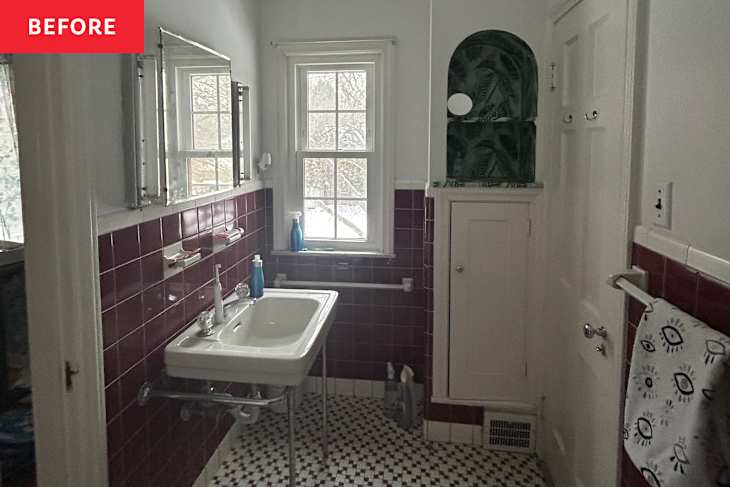
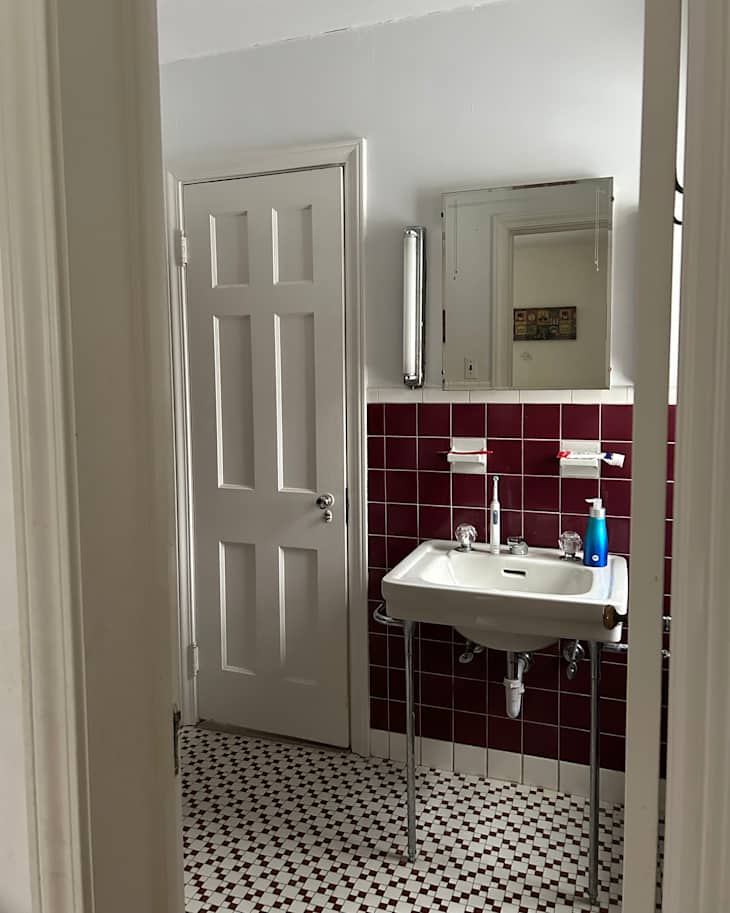
My family’s previous builder-grade house in Florida was full of bland 2000s beige 12-by-12 tile that was far from inspiring. So when we moved into a 1938 home in a Cleveland suburb, swapping out the vintage maroon tile in my son’s bathroom was out of the question. Here, we have original 4-by-4 tiles with white trim on the walls, and a mosaic pattern on the floor — the fact that it’s still here after almost 90 years is a miracle. While I loved the color palette, I found the stark white paint on the top half of the bathroom wall completely impersonal and not at all fun for an 8-year-old who uses this Jack-and-Jill bathroom.
I tried to add some personality to the space with a large art canvas from HomeGoods that features a rainbow-hued school of fish. Yes, it added a splash of color, but the bathroom still felt incomplete. So when I ended up with a roll of Livden Soleil peel-and-stick wallpaper in Persimmon, I took the opportunity to give this space a makeover.

In addition to writing, I have an interior design consulting business, DesignFix, so I am always trying out new products in my own home. Livden sent me the Soleil to try for another project — an accent wall in the neighboring playroom. However, the 48-inch panel proved too heavy for the slightly textured wall. Luckily the pastel-pink-orange-white combo paired perfectly with the deep burgundy hue of the bathroom tile. The sunburst added just enough interest without creating a visual cacophony or clashing with the busy mosaic floor.

Small Lighting Upgrades Make a Big Difference
Because this project is for my son’s bathroom, I wanted to lean into the whimsy. The original chrome fluorescent tube lighting, with its decades of rust spots, created the perfect opportunity. First, I used an aluminum foil hack to clean it off. All you need to do is crumple up aluminum foil and scrub with it until the rust disappears. I knew I wanted to spray paint the lighting, so it didn’t have to be perfect as long as the bumpy parts were smoothed out. I decided to go for a bold orange — a lovely way to add some zing without turning the space into a circus.
Having worked with spray paint before, I know just how messy it can get. Prepping took almost an hour as I taped up all the surrounding areas, including the tile, mirror, and sink, with plastic. The little particles go everywhere, and I was not about to ruin my vintage tile with a $6 bottle of Rust-Oleum. I chose the Rustic Orange color in a satin finish because it was the closest match to the sun prints of the wallpaper.

If you’ve never used spray paint indoors, opening up the windows is imperative, as is wearing a respirator mask. It took about three layers to get an even finish and saturation. The actual spray painting only took about 10 minutes, but I had to wait at least an hour between coats.
I started the wallpaper installation the following morning, and the fumes were still pretty strong. I was in a bit of a time crunch, but in the future I will definitely build in at least 24 hours before returning to the treated space.

Peel-and-Stick Wallpaper Can Be Challenging to Install — But Worth It
The peel-and-stick wallpaper came on one large roll and was noticeably thicker than some of the other brands I’ve worked with before. I used a Fiskars utility knife instead of a detail knife to cut through. Livden peel-and-stick is made of recycled polyester and natural fibers that give it a subtle texture with a cloth-like quality — it feels like high-end traditional wallpaper. Because the length of the panel was 48 inches, I didn’t have to do too much cutting for the main sections of the wall.
But as it turns out, to my dismay, the previous owners painted over old striped wallpaper. The combo of paint on very old wallpaper created its own texture. While flat, something about it made it more difficult for the peel-and-stick to stay put. To ensure the sheets stayed up, I applied Roman PRO-880 wallpaper adhesive on all the edges. It’s been more than two weeks, and the wallpaper is still in place. One thing that was a little frustrating was that because the panels were intended for another project, the 48-inch pieces were a little tricky to maneuver and just a tad too short in some places, so I ended up having to cut narrow strips to fill in the gaps. Livden does offer 24-inch panels, which is something I would recommend for smaller spaces.

The other challenge was lining the interior of the bathroom’s arched built-in shelf. At this stage, I had plenty of smaller scrap pieces, so aligning the wallpaper was easier. But first I had to remove the Dollar Tree peel-and-stick sheets that I had previously installed there and now regret using. Those TikTok hacks got me; in an attempt to spruce up the bathroom more than a year ago, I tried to decorate this cubby space with a banana leaf print. Unfortunately, these $1.25 sheets do not just peel off. The whole thing was a disaster and took more than two hours. Even then, it wasn’t perfect — I just lined the rest with Livden. Finishing this section took me at least three hours, and I needed to use the detailing knife with the precision of a surgeon to trim all the excess around the arch and shelves.
Overall, the main wallpaper installation took about six hours, with another three hours for trim pieces and pasting, and three hours for the cubby. Local wallpaper installers charge approximately between $50 to $80 per hour, so I saved at least $600 by going the DIY route. The Livden peel-and-stick wallpaper is $80 for a 48-by-36-inch panel. Originally, I requested it for a 14-by-8-foot accent wall, so my 11-linear-yard roll would have been $880. As the bathroom is a bit smaller, I had about two linear yards left over. This is definitely a more upscale peel-and-stick that is made with at least 20% post-consumer content and is PVC-free. I like that it’s sustainable, but more importantly it’s low-VOC and free of formaldehyde — chemicals I would never want in a space that my son uses multiple times a day.

Little Details Make a Space Kid-Friendly
The final touches were easy. I used the multicolored fish art to break up the range of pinks and introduced the striped Pillowfort tassel shower curtain that my son chose. Taking the marine theme a bit further, I also added a Jonathan Adler x TilePix “Playa Sail Boat” piece (to match one of his bath toys!). I love that these stick to a big foam magnet, so I can update the imagery when he grows out of the nautical theme.
The checkered bath towels and daisy hand towels were a steal from the HomeGoods clearance section; the bundle cost me less than $20. As I was placing the towels on the white rack, I remembered that I had a sample of Benjamin Moore English Ochre paint, which actually reads more orange than golden yellow. I applied a few layers of that to the rack while I was at it, which was an easy way to inject more of that fun hue and tie it all together.

Now that everything is done, I love how this Jack-and-Jill bathroom has the personality it deserves. The Soleil print adds a twist that pairs beautifully with the vintage tile, but the overall effect is very much updated. I am actually glad that the initial accent wall project didn’t work out because this transformation might not have happened if it weren’t for a bit of kismet.